

Getting started
The following will help you get started for the first time setting up your decoder at your Campus.
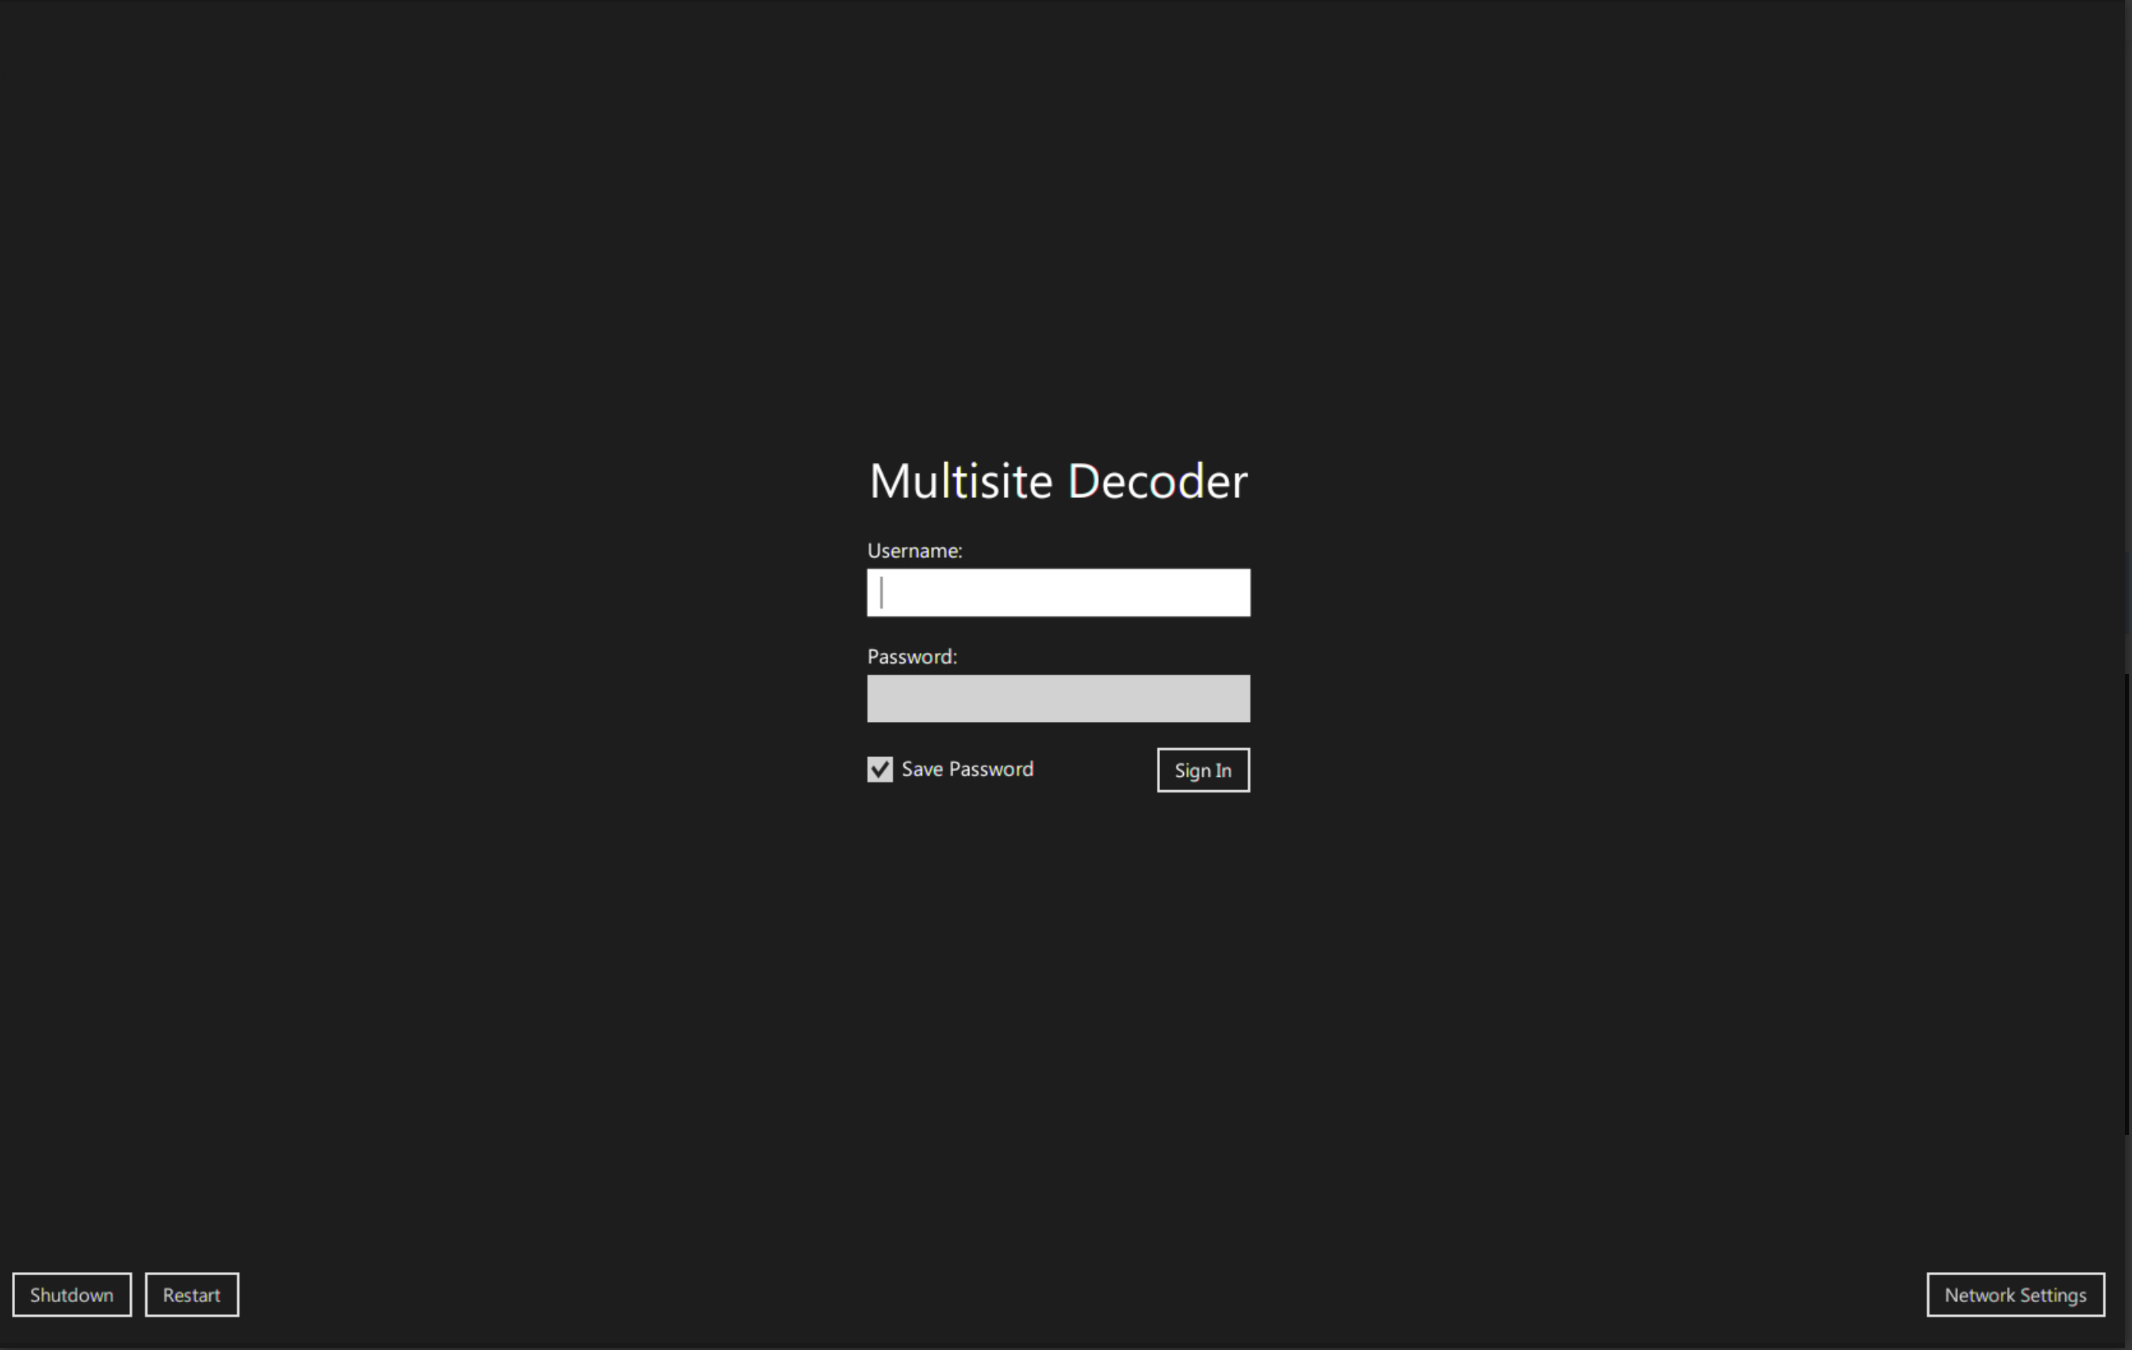
First time boot
When booting into the Decoder you will be prompted to enter your username and password. These will have been provided to you by our team. Your username is the campus you are at.

Network Settings
Network related settings can be adjusted from the login screen. Click Network Settings in the bottom right corner to configure your IP address and DNS settings or to view the MAC address.
DNS Caching helps resolve requests to one server so that data can be reliably downloaded from the closest data center instead of being pulled from multiple locations.

Monitor resolution
Upon using your Decoder for the first time you may have to adjust your monitor resolution.
- Go to the Settings tab on the left.
- Click Change under Monitor Resolution.
- Set the correct resolution to match your display.
- 1920x1080

video output format
Before using the platform, you will have to set the correct SDI / HDMI output resolution to match your production environment. Video and audio are output to both SDI and HDMI simultaneously.
- Go to the Settings tab on the left.
- Click Change under Current Format.
- Set the correct resolution to match your environment.
- Next, select which output device you would like to use. For example card 1 or both 1 & 2.
- Click the Test button to confirm video output.
Note: 1080PsF will allow you to play events encoded with both interlaced and progressive scan types when outputting interlaced formats.

Selecting an Event and Managing Local Disk Cache
Once a user is logged-in a list of available events with their respective start date/time will be displayed on the Events tab of the application. Please note: event dates are formatted as MM/DD/YYYY in the United States, YYYY/MM/DD in Canada and DD/MM/YYYY in all other countries based on the time zone selected in the Settings tab.
Events can take up to 2 minutes to appear after the encoder is started; the “Refresh List” button can be used to check for new events. Select the desired event from the list and click “Select Event” to load the event. Once selected you will see the event name displayed in the top center.
If the decoder detects that previously cached (saved) content exists on the local hard drive, a prompt will display asking if you wish to clear (delete) the locally cached data. You should always “clear” the data if you are selecting a new stream and no longer need the old data. If you wish to keep the previously saved data select “Don’t clear,” but be mindful that limited disk space is available.
Even though the application will monitor available disk space there is no way to clear the cache while streaming, so it is important to clear unnecessary data when loading a new stream. The user interface will be disabled while the cache is clearing; the application’s Activity Indicator, which is displayed in the lower left corner of the application, will display until the cache has been cleared.

Controlling Playback & Understanding the Buffer
Once an event is selected the audio/video will begin to buffer immediately. This value will continue to grow until it reaches the size configured on the settings tab — up to a maximum of 60 minutes. The buffer can only obtain content which is available in the cloud (if playing in Cloud Mode) or on the encoder (if playing in LAN Mode). Use the player control buttons (1) and scrubbar (2) to manage video playback.
It is important to understand that the decoder will always download the highest quality video available, you should wait for it to buffer some content before trying to play. The more content that has buffered the more reliable playback will be. Underneath the scrub bar the amount of video currently buffered will be displayed (3).

Audio meters
Audio meters display the level of audio signal on channels 1-16. Active audio channels (based on how many channels of audio were encoded) will be shown in white, inactive channels will be gray. For example, events encoded with only two channels of audio will show 1-2 as white while 3-16 will be greyed out. These audio meters are intended to show the presence of audio not precise dBFS values.
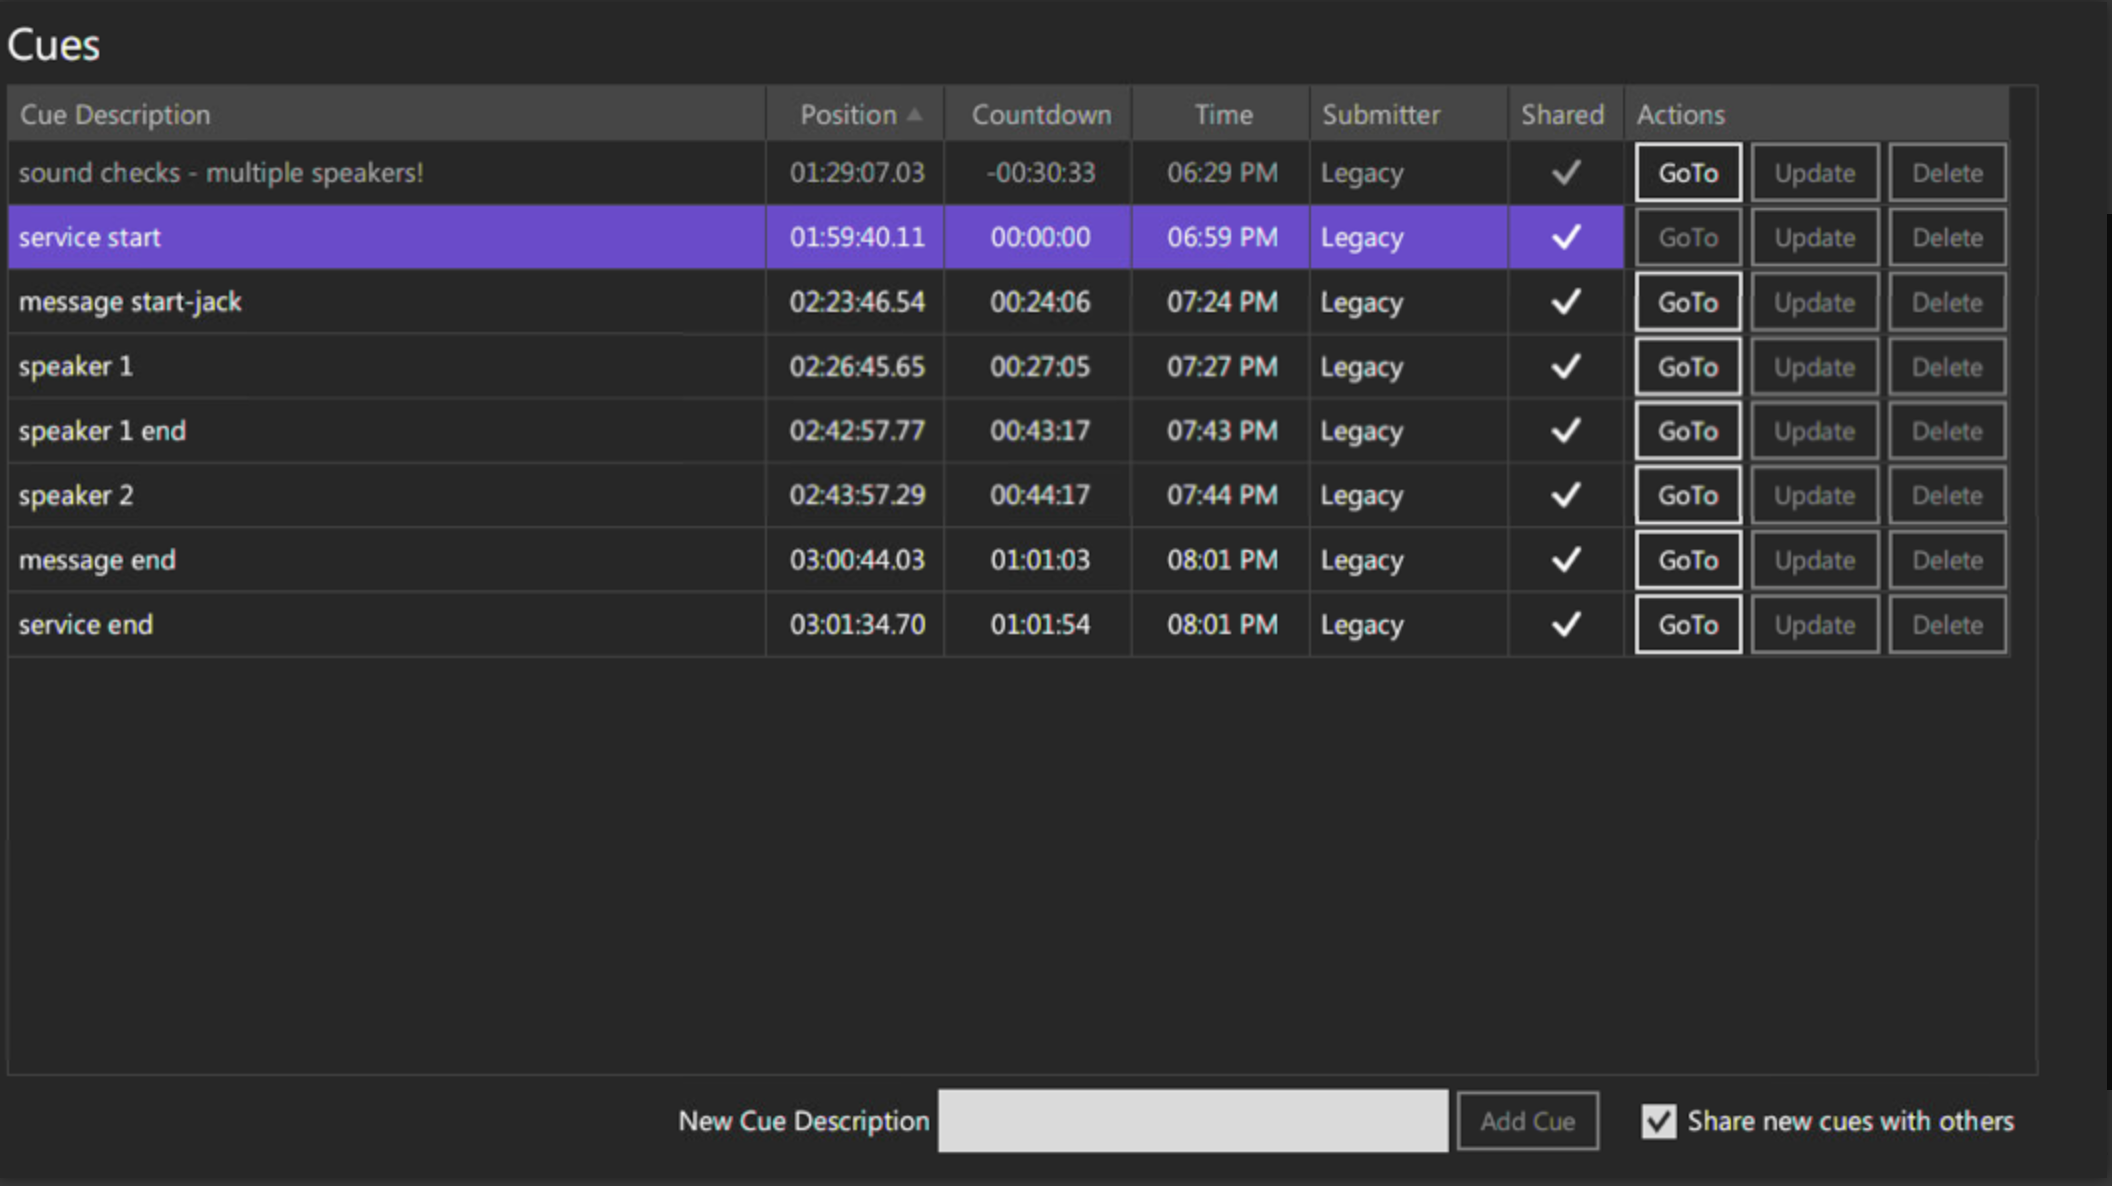
Cues
Cues make it easy for an organization’s users to communicate important points of reference in the video timeline with each other user. For example, a Host Site user can identify a common start point in a live video by creating a cue which indicates the exact time which is relevant for Remote Site users to begin playback at. Each cue’s information will sync automatically to all viewers of an event.
A cue Position is relative to its event timeline, where the event timeline begins at 00(h):00(m):00(s). For example, if a cue is set to identify an action that took place 30 minutes into the streaming event the cue time will be 00:30:00.
The Countdown time for a cue will represent the difference in time between the cue time and the current video playtime. For example, if a cue is set for 00:30:00 and the current position of the video is 00:10:00, the countdown will display 00:20:00 because there are 20 minutes remaining before the video playtime reaches the cue.
The Time column indicates the clock time when the cue was set. It will match the time zone set on your Decoder in the settings tab.
To create a new Cue, pause the video at the desired time, then type in a New Cue Description and click “Add Cue.” All users may then click “GoTo” on a Cue to jump to the specified timestamp. The currently selected Cue will be highlighted purple, and all past Cues will be grayed out. The Cue’s time can be updated by clicking the “Update” button, which will update the selected Cue to the current timestamp. Only the creator of a Cue may delete or update a Cue.

Emergency Hotspot Failover
Multisite Decoders and Encoders are able to fail over to a cellular hotspot in the event of an emergency. This process can vary between cellular devices so please test with your specific device before an emergency occurs. To setup the connection…
- Enable the hotspot feature on your cellular device.
- With your device unlocked, plug it into the Decoder via a USB cable. The lite-blue USB 3.1 port is currently not compatible.
- Upon connecting you will receive a prompt on your device asking to allow the connection. Press “allow” or “trust”(your device may vary).
- Once you have trusted the Decoder on your device, the Decoder may still display a message saying “The device is not yet trusted…” Click “Try Again” to allow the Decoder to try the device’s internet connection once more.
- The Decoder should begin to use the cellular internet connection momentarily. You will receive a notification on your Decoder when it detects the new internet connection.
Note: This can also be done on an Encoder in the case of an emergency internet outage. Since you have no way to press the “Try again” button on an Encoder, once you have trusted the Encoder on the device, simply unplug the device from the Encoder, and re-plug it in; then the Encoder will use the cellular connection since it has been trusted & remembered.

Team viewer support
Multisite Decoders have TeamViewer remote support built in. Users can use TeamViewer to access the decoder in order to provide remote support or basic management. This is helpful for technical directors who manage a large number of remote sites, or have sites which are very far away.
An active remote connection to a decoder with TeamViewer will consume additional hardware and software resources on the decoder, and therefore could reduce the quality of video playback while the connection is active. It is very important to never have an active TeamViewer connection while the decoder is being used for production purposes, and TeamViewer should not be used to remotely trigger video playback for production purposes.
To access TeamViewer…
- Navigate to the Support tab.
- Use the toggle switch to enable the TeamViewer service*.
- An ID and password for temporary connections will be generated and displayed. This ID and password can be used to connect to the decoder remotely. The ID and password will persist across decoder restarts, and will remain the same until the TeamViewer service has been restarted or disabled (via the in-app toggle).
*Note: If this is your first time using TeamViewer on a decoder, you will have to accept the End User License Agreement. This agreement typically takes about 10 seconds to display after enabling the service for the first time. Once the agreement has been accepted you will need to restart the service by using the toggle switch to turn it off and then back on.